

Painting on a sliced tree branch gives a nice organic touch to your ornaments. On this one I painted a Christmas scene and used some of the colors in the outer layers that was on the original birch tree branch; it helped to tie in the colors.
In addition to the birch tree rounds, you will also need some fine grain sand paper, acrylic wood sealer (for artists), artist paint brushes, your paint colors, and artist varnish.
I purchased the birch tree rounds already cut. However, they still needed sanding. After sanding, I coated the sides with the acrylic wood sealer. This raised the wood grain again a bit, so I did a second sanding to smooth it out.
The nice thing about acrylics is that you can layer the paints, so I began with shading in the background. I was going for an evening look, so I used a little Deep Midnight Blue by Americana, mixed with white. I kept the whiter area at the bottom, and the more bluish color around half way up and towards the top.
Once that is dry, you can draw in where you would like the cabin to be. I like using watercolor pencils for my drawing, then the colors of the pencils easily blend in with the paint. If you'd like a different shape for the cabin, you can do a search on images online for cabins, to find the general style that you would like to use.
I reversed the direction of the cabin shape that I decided to use, because I wanted the cabin to sit on the right and to face towards the center.
I painted in the whole basic cabin. Once my cabin was dry, I painted in windows, the door, shading, and highlights. Once those were dry, I added in a blend of the snow colors over the door and windows.
Then you can decide where you want your trees. Paint them in with a darker shade of green and then add a lighter of shade of green while the first layer is still wet. Mix it around a bit to get different areas of light and dark. You don't need to be too exact here; snow will be covering up quite a bit of the green.
Let the trees dry, then paint in some snow on the branches. You can add the darker snow toward the deeper part of the branches and lighter snow towards the front edges.
The tree that I chose to decorate, I added lights and garland first, then a little bit of snow just on top of the garland. Most of the snow on this tree would have melted off because of the lights.
You can add a path to your door if you like. I did this by painting in white, and making it more narrow as it got closer to the door. Then add some different shades of light blue snow along the edge of the path (where is has been smoothed out and shoveled.)
You can add in a mailbox if you want. Once everything is dry, you can add a coat of artist art varnish for acrylics to help protect your painting.
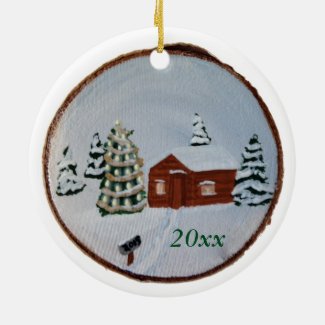
I left the area to the bottom right open, so that I can sign it there (on the original), and to leave an open space for people to type in a year on my ceramic ornaments to purchase.
I used an eyelet screw that I screwed into the birch wood by hand. I did use a pair of pliers to help turn the screw. I started the screw by hand, then covered the eyelet part with a small piece of paper towel folded over, then used the pliers to turn it the rest of the way.
Here is a photo of the painted birch ornament printed on round ceramic ornaments:
Happy holidays to you.
Cheryl Paton
View more Christmas Ornaments by CherylsArt at Zazzle.
No comments:
Post a Comment