My daughter had long hair, past her shoulders, which she wanted cut in to a straight shoulder length cut. I had watched beauty shop people do it before, and had done it that way before, too. Then one day, at the beginning of the haircut, I had a new idea; It worked so much better. Read on to find instructions and supplies.
Supplies:
Gather your supplies. You will need quality hair cutting scissors, a cape, a chair that is high enough for giving haircuts, and a comb.
Steps:
Wet the hair down. Wet hair is easier to cut than dry.
* Measure from the top of the head down to the desired length of the haircut. Note how much more hair is below, lengthwise, of where the new length is to be.
Section a two to three inch wide strip of hair on the top of the head and comb.
You want to keep the strip on the thinner side, so that this section doesn't become too layered.
This is the first cut, and the most important one. This first step determines the length of the rest of the hair cut.
Holding this strip straight up on top of the head, depending on which side you're on, recall the measurement from * that you noted above. Cut from front to back or back to front, keeping the edges straight. Hold the hair between your fingers on one hand, and cut with the other hand.
This photo is from after I already did the first cut.

The shears that I have used for over 40 years, are by Revlon if you are interested. You might find them elsewhere. Otherwise, the ones above got very good reviews, overall.
Comb the first section of cut hair down into the remaining hair.
Part the hair in the center.
Starting on one side, combing as you go, find the end of the first layer that you just cut, pulling in some under hair, pull both sections straight, and cut that section of hair to the edge of the already cut hair that you are holding.
If you are working with thick hair, you may need to do this step several times in each section. For thinner hair, you may be able to easily cut more layers of hair at once.
Repeat on the other side.

Using the same technique, and the two sides to help you keep things in line, cut the back hair.
Comb hair well, in different directions to loosen up any pieces that may have become hidden.
Cut to the length of the cut hair.
Having my daughter sit at a comfortable height for me, is a big help. I use an artist drafting chair that is adjustable, ; it also has a back rest and a foot rest, making it comfortable for her as well. I prefer using a chair without arms on it.
Voila, she is happy with her hair cut.
Why I like this method.
I didn't have to pin piles of hair on her head.
I didn't have to cut one side and keep measuring to see if they were even. Holding the top layer straight over the center of her head, at the beginning of the cut, served as my guide for keeping the hair even, once I combed that section down.
This is the basic haircut that I have been giving my daughter for around the last 20 years.
See how I gave myself a short haircut here: https://www.reviewthisreviews.com/2024/11/atmoko-hair-clippers-review.html
Cheryl Paton

1. Pour paint onto a surface that the paint will easily peel from once the paint is dry.
2. About 1/8 inch is a good thickness for your paint pour skin.
3. Let the paint dry thoroughly.
4. Start from an edge, and gently peel the paint skin from the surface.
Those are the simple instructions, and you can get started anytime that you choose.
For a little more detail and guidance, read on:
You will need a non-stick surface that your paint can be easily peeled from. I use a baking silicone mat. I've seen others use plastic sheet dividers; the kind that are for notebooks.
It is helpful for your different colors of paint to be of the same consistency.
It is fun to experiment to create different designs and effects. Try making designs with different colors and patterns. Swirl some designs, press others, tilt and rotate others, etc.
Each paint skin has two sides! They will not necessarily look the same. You get to choose which side to use in your artistic creation. Shown below is the other side of the chameleon design that is shown above!

Patience is key. I create my paint skins in our basement, which is relatively cool. It usually takes two to three days to dry thoroughly. It may only take two days if your paint pour is in a warmer location. If you peel to soon, and you see some of the paint sticking to the surface, gently press it back down, and give it an extra day of drying time.
Once I made my acrylic paint skin, I then created the background that I will place my paint skin on.
For this design, I wanted to create a funky chameleon. I didn't have any chameleon photos of my own, so I searched for a royalty free chameleon image. I found one that I liked, and made a donation to the creator. I used the image to easily create the shape that I wanted to use. I printed the original chameleon and cut it out; that became the template that I used on my dry acrylic paint pour.
I traced the shape onto the side that I wanted to use. I chose to trace it onto the side that I wanted to be visible so I could line my colors up better. You can also trace on the reverse side of the skin, so there won't be any visible tracing marks. I then cut out the shape with scissors.
Once you have your paint skin the way you want it, you can attach it to a surface. You can attach it to jewelry, magnets, canvases, etc. For jewelry and magnets, you can use diamond glue. For attaching your acrylic skin to canvas, you can simply use acrylic paint as the glue. Just paint it on the reverse side, press down, and let it dry. You can then add any additional details to the skin, and or your background surface.
Thanks for stopping by. If you like this page, please share it. Thank you.
Here is one of the products that I added the green chameleon to.
You can find more chameleon products by CherylsArt on Zazzle here: Chameleon by CherylsArt
Cheryl Paton
Mosaics, by nature, refer to stones, tiles, etc., that have been cut apart, and then mortared together to achieve a picture. Although artists of various kinds can also make mosaics that don't require stones. One of the techniques to use is paint. Here I'll share with you four different ways that you can create a mosaic painting. Each one has their own unique look.
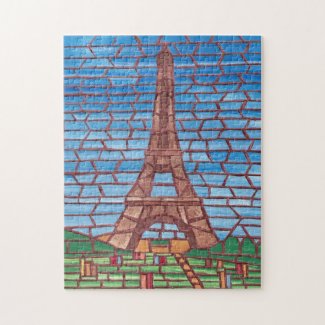
In this first technique, I painted my "stones" by painting variegated colors on sheets of canvas. You can use a variety of colors, and give them different colors, blends, and/or textures to find the look that you are going for. I then drew my design on a new sheet of canvas, cut my "stones" apart with scissors, from the painted canvases. Then I glued them in place to make my Eiffel Tower design.
Here it is pictured on jigsaw puzzles for some added fun.
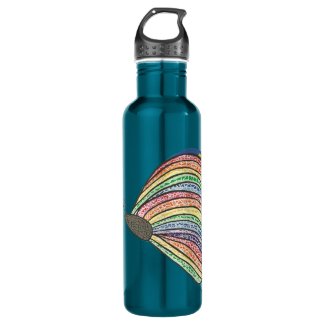
With this next design, I started with an initial butterfly drawing, and painted in strips of color on the wings, I painted a darker color on the body. I then applied a crackle medium for acrylic paints. After it is applied, the paint will start to separate and little lines will appear - making the paint look like it is breaking apart. That is the beginning of the mosaic look here.
I then went in and painted the cracked areas of the body, with black.
I added a lighter mortar colored paint to outline the colors on the wings. Here it is printed on stainless steel water bottles. You can choose from a variety of colors for the bottle.
In many mosaics, the glass has a see through or translucent look.
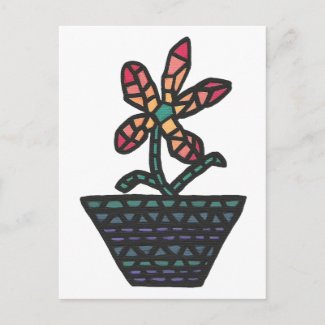
In this flower painting that I did, I used a floating medium for acrylic paints to achieve a translucent look. It is a clear gel like liquid, that helps acrylic paint to look like water colors. You can also use extenders and blending mediums, but I prefer the thickness of the floating medium for this technique.
You can mix it directly into the paint, or as I did in this painting, apply it directly to the canvas first, and then add apply the paint on top of it, while both are still wet.
Once I got my "cut tiles" filled in, I outlined the pieces in black. Here it is printed on postcards.
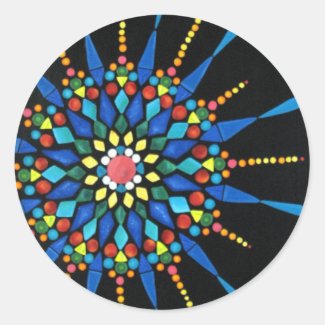
The first mosaic painting that I did was one of gem stones.
I started by drawing circles on my canvas. That was going to give me the background for arranging the "gem stones."
There was no crackle medium or floating medium used in this painting. All the shading and highlights were done simply by blending the acrylic paint directly on the canvas.
In this mosaic painting, the "tiles" do not fill in the whole area. Also, I made some of the stones round, which would normally be kind of hard, if someone were cutting out actual tile. However, mosaics can be made from a variety of mediums, including round stones and pebbles.
Once I completed this painting, I varnished the black area with a matte varnish, and the stones with a gloss varnish, for an enhanced effect.
Here it is printed on stickers.
All of the acrylic mediums listed above are the ones that you can find in craft stores.
Which is your favorite mosaic look? Which mosaic technique would you like to try?
Cheryl Paton